はじめに
最終的な目標はクリックだけでスクショが撮れ、画像の編集もできるツールを作ること。現在は、クリックだけでスクショを撮る部分を作っています。
前回の記事でスクショ機能部分がほとんど完成しました。
今回は、以下のやり残した処理(思いついた処理ともいう)等を追加していきます。
- システムメニューを表示しない
- スクショ画面を多重起動しない
- 前回の撮影モードを記憶する
- 保存先を設定できる
システムメニューを表示しない
スクショ画面で「Alt+Space」を押すと次のようにシステムメニューが表示されます。「Alt+Space」を押すことはないと思いますが、気が付いてしまったので表示されないようにしておきます。
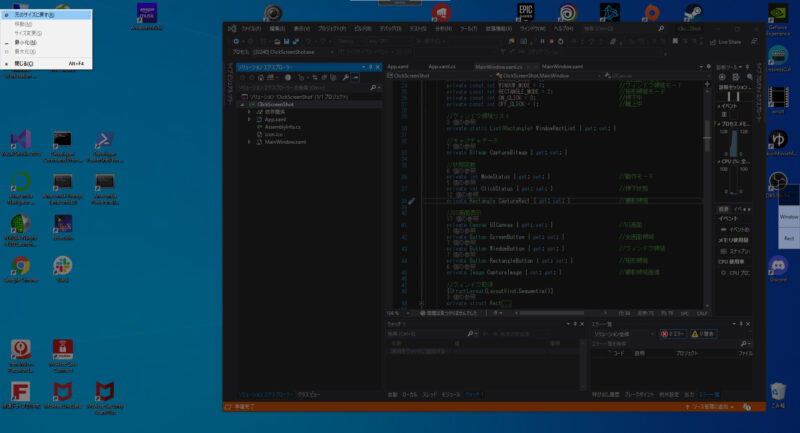
usingディレクティブに次のコードを追加。
using System.Windows.Interop;
「MainWindow.xaml.cs」の「public partial class MainWindow : Window」クラス内に次のコードを追加します。
private const int GWL_STYLE = -16;                          //システムメニュー非表示
private const int WS_SYSMENU = 0x00080000;

//システムメニュー非表示
[DllImport("user32")]
protected static extern int GetWindowLong(IntPtr hWnd, int nIndex);

[DllImport("user32")]
protected static extern int SetWindowLong(IntPtr hWnd, int nIndex, int dwLong);

protected override void OnSourceInitialized(EventArgs e)
{
    base.OnSourceInitialized(e);
    IntPtr Handle = (new WindowInteropHelper(this)).Handle;
    int WindowLong = GetWindowLong(Handle, GWL_STYLE);
    WindowLong &= (~WS_SYSMENU);
    SetWindowLong(Handle, GWL_STYLE, WindowLong);
}
タスクバー表示の削除
ついでにタスクバー表示も害はないですが、気になるので消しておきます。

「MainWindow.xaml.cs」の 「public MainWindow」メソッド内に次のコードを追加。
ShowInTaskbar = false; //タスクバー非表示
スクショ画面を多重起動しない
2つ以上のウィンドウを起動しようとした際に元々存在するウィンドウを閉じるようにしました。
「App.xaml.cs」の「App」クラスにプロパティとして次のコードを追加。
//スクショ画面
MainWindow CaptureWindow { get; set; }
「IconClick」メソッドを次のように修正。
//アイコンクリックイベント
private void IconClick(object sender, EventArgs e)
{
    //左クリックの場合のみウィンドウ表示
    MouseEventArgs MouseClick = (MouseEventArgs)e;
    if (MouseClick.Button == MouseButtons.Left)
    {
        //ウィンドウが存在する場合ウィンドウを閉じる
        if (CaptureWindow != null)
        {
            CaptureWindow.Close();
        }

        CaptureWindow = new MainWindow();
        CaptureWindow.Show();
    }
}
前回の撮影モードを記憶する
Json形式で撮影モード等の記録を行うため、まずは以下の手順でクラスファイルを追加します。
- プロジェクト名を右クリック
- 「追加」「新しい項目」の順にクリック
- 「クラス」を選択して「追加」をクリック
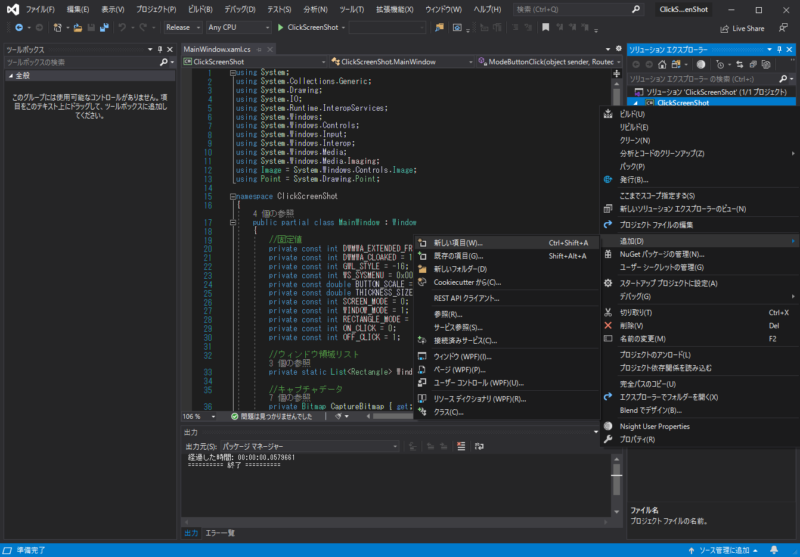
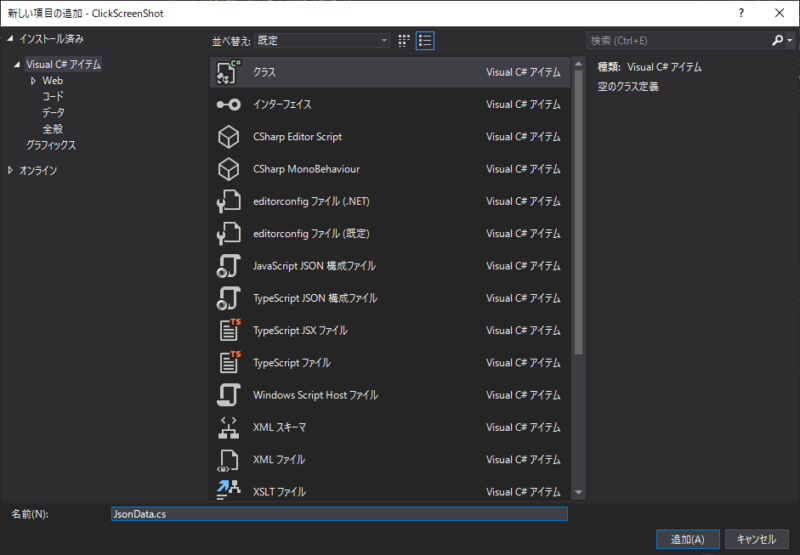
作成したクラスは次のコードに編集。ファイル名は「JsonData.cs」としました。
namespace ClickScreenShot
{
    public class JsonData
    {
        //動作モード
        public int ModeStatusJson { get; set; }
    }
}
Jsonファイルの追加
次に以下の手順でJsonファイルを追加します。
- プロジェクト名を右クリック
- 「追加」「新しい項目」の順にクリック
- 「JSONファイル」を選択して「追加」をクリック
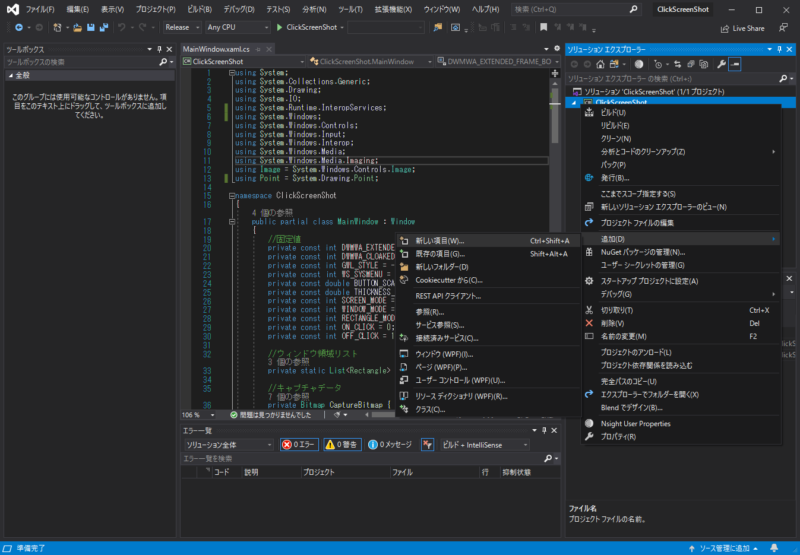
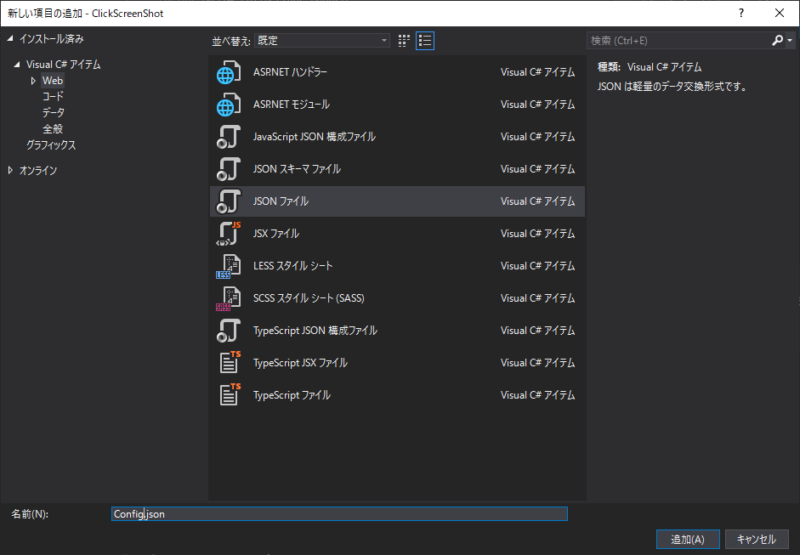
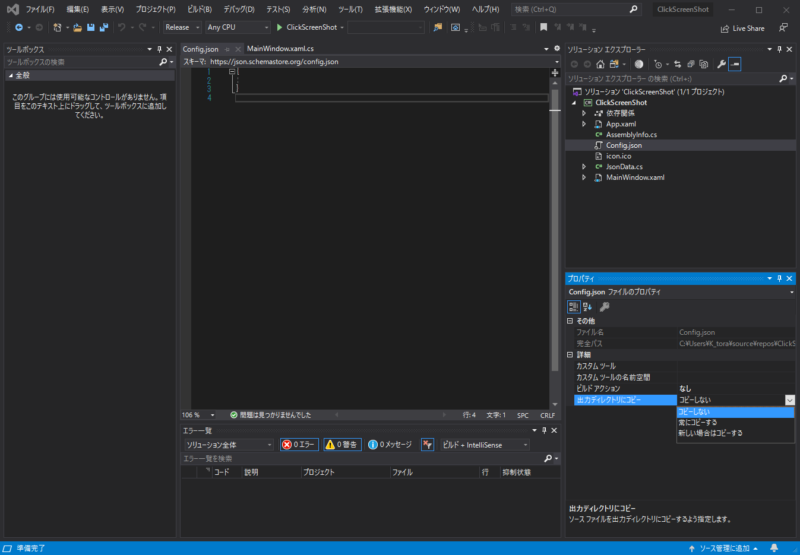
Jsonファイルの内容は次の通りです。ファイル名は「Config.json」です。
{ "ModeStatusJson": 0 }
コードの修正
「MainWindow.xaml.cs」のコードを修正していきます。
まずは「usingディレクティブ」に以下を追加。
using System.Text.Json;
「MainWindow」クラスに以下のメソッドを追加。
//モードの初期化
private void InitModeStatus()
{
    //モードをJsonファイルから取得
    using FileStream fs = new FileStream("./Config.json", FileMode.Open, FileAccess.Read);
    using StreamReader sr = new StreamReader(fs);
    JsonData JsonIn = JsonSerializer.Deserialize<JsonData>(sr.ReadToEnd());
    ModeStatus = JsonIn.ModeStatusJson;
}
「MainWindow」メソッドを次のように修正。
public MainWindow()
{
    InitializeComponent();

    //ウィンドウ領域リストを初期化
    WindowRectList = new List<Rectangle>();
    EnumWindows(EnumerateWindows, IntPtr.Zero);

    //スタイル
    WindowStyle = WindowStyle.None;                         //境界線,ボタンの非表示
    WindowState = WindowState.Maximized;                    //全画面表示
    BorderThickness = new Thickness(THICKNESS_SIZE);        //WPF全画面表示バグ対応
    Topmost = true;                                         //最前面表示
    ShowInTaskbar = false;                                  //タスクバー非表示

    //背景
    AllowsTransparency = true;                              //透過許可
    Background = new SolidColorBrush(Colors.Transparent);   //透過

    //キャプチャデータの初期化
    InitCapture();

    //モードの初期化
    InitModeStatus();

    //状態変数初期化
    ClickStatus = OFF_CLICK;
    CaptureRect = new Rectangle();

    //UI画面初期化
    InitUI();
    this.Content = UICanvas;                                //ウィンドウにUI画面を追加

    //モード選択ボタン更新
    ModeButtonUpdate();
}
「ModeButtonUpdate」メソッドを次のように修正。
//モード選択ボタン更新
private void ModeButtonUpdate()
{
    //選択可能色
    SolidColorBrush SelectableColor = new SolidColorBrush
    {
        Color = Colors.White,
        Opacity = 0.5
    };

    //選択不可能色
    SolidColorBrush UnSelectableColor = new SolidColorBrush
    {
        Color = Colors.Black,
        Opacity = 0.5
    };

    //ボタンの色を更新
    ScreenButton.Background = ((int)ScreenButton.Tag == ModeStatus) ? UnSelectableColor : SelectableColor;
    WindowButton.Background = ((int)WindowButton.Tag == ModeStatus) ? UnSelectableColor : SelectableColor;
    RectangleButton.Background = ((int)RectangleButton.Tag == ModeStatus) ? UnSelectableColor : SelectableColor;

    //Jsonファイルの読み込み
    FileStream ReadFs = new FileStream("./Config.json", FileMode.Open, FileAccess.Read);
    StreamReader ReadSr = new StreamReader(ReadFs);
    JsonData JsonOut = JsonSerializer.Deserialize<JsonData>(ReadSr.ReadToEnd());
    ReadSr.Close();
    ReadFs.Close();

    //データの変更
    JsonOut.ModeStatusJson = ModeStatus;

    //モードをJsonファイルに出力
    FileStream WriteFs = new FileStream("./Config.json", FileMode.Create, FileAccess.Write);
    StreamWriter WriteSw = new StreamWriter(WriteFs);
    WriteSw.Write(JsonSerializer.Serialize(JsonOut));
    WriteSw.Close();
    WriteFs.Close();
}
これで撮影モードを記憶するようになりました。
ファイルが存在しない場合。。。?消したユーザーが悪いと思います。完成を優先させます。
保存先を任意の場所にできる
先ほど動作モードを記憶させるために作った仕組みを使っていきます。
「JsonData.cs」を以下のようにして、保存先を格納できるようにします。
namespace ClickScreenShot
{
    public class JsonData
    {
        //動作モード
        public int ModeStatusJson { get; set; }

        //保存先フォルダ
        public string SaveFolderJson { get; set; }
    }
}
「Config.json」は次のようにして、保存先フォルダが設定されていない場合(インストール直後)を判定できるようにしておきます。
{"ModeStatusJson": 0, "SaveFolderJson": "CLICKSCREENSHOT_DEFAULT_FOLDER"}
「MainWindow.xaml.cs」の「MainWindow」クラス内に次の固定値を用意。
private const string CLICKSCREENSHOT_DEFAULT_FOLDER = "CLICKSCREENSHOT_DEFAULT_FOLDER"; //規定の保存先
「MainWindow」クラスの「SaveCapture」メソッドを次のように修正します。
//キャプチャの保存
private void SaveCapture()
{
    //矩形領域の複製
    Rectangle SaveRect = CaptureRect;

    //例外処理
    if (SaveRect.Width == 0 || SaveRect.Height == 0)
    {
        return;
    }

    //矩形領域の調整
    if (SaveRect.Width < 0)
    {
        SaveRect.X += SaveRect.Width;
        SaveRect.Width *= -1;
    }
    if (SaveRect.Height < 0)
    {
        SaveRect.Y += SaveRect.Height;
        SaveRect.Height *= -1;
    }

    //保存先フォルダの取得
    using FileStream fs = new FileStream("./Config.json", FileMode.Open, FileAccess.Read);
    using StreamReader sr = new StreamReader(fs);
    JsonData JsonIn = JsonSerializer.Deserialize<JsonData>(sr.ReadToEnd());
    string FolderName = JsonIn.SaveFolderJson;

    //規定フォルダへの変換
    if(FolderName == CLICKSCREENSHOT_DEFAULT_FOLDER)
    {
        FolderName = System.Environment.GetFolderPath(Environment.SpecialFolder.MyPictures);
        FolderName += "\\ClickScreenShot";
    }

    //フォルダが存在しない場合は作成する
    if (!Directory.Exists(FolderName))
    {
        Directory.CreateDirectory(FolderName);
    }

    string FileName = FolderName + "\\ClickScreenShot " + DateTime.Now.ToString("yyyy.MM.dd-HH.mm.ss.fff") + ".png";

    //画像の保存
    Bitmap SaveBitmap = CaptureBitmap.Clone(SaveRect, CaptureBitmap.PixelFormat);
    SaveBitmap.Save(FileName, System.Drawing.Imaging.ImageFormat.Png);
}
保存先はJsonファイルに設定されたフォルダ。フォルダが設定されていない場合は、規定フォルダ(ユーザーの画像フォルダ内)とします。
ファイル名は日付時刻にしていい感じに保存されていくようにしておきました。
保存先を設定する画を用意する
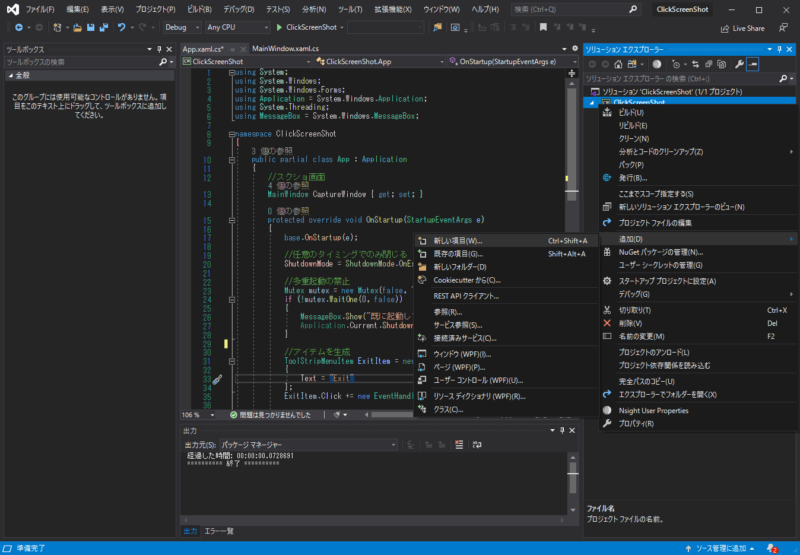
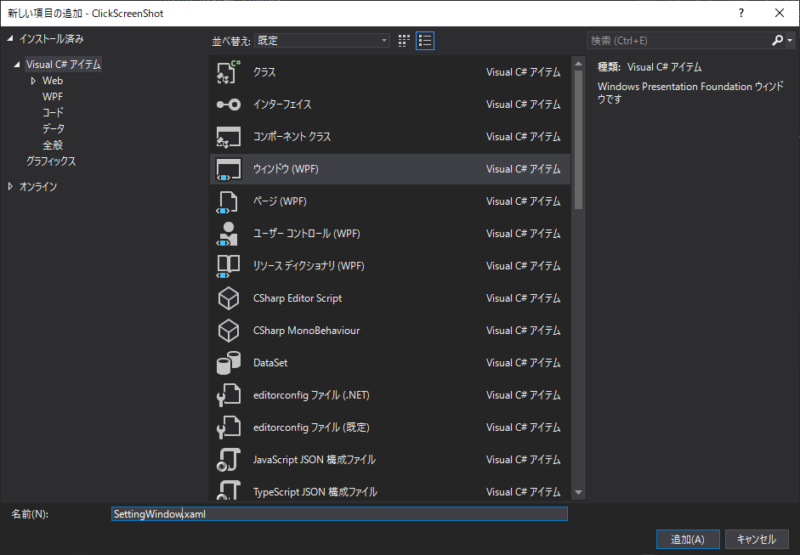
次の手順で、設定用のウィンドウを用意する。
- プロジェクト名を右クリック
- 「追加」「新しい項目」の順にクリック
- 「ウィンドウ(WPF)」を選択して「追加」をクリック
以下の手順で、WindowsAPICodePack-Shell(Nugetパッケージ)を追加します。
- プロジェクト名を右クリックし「Nugetパッケージの管理」をクリック
- 「Microsoft-WindowsAPICodePack-Shell」をインストール
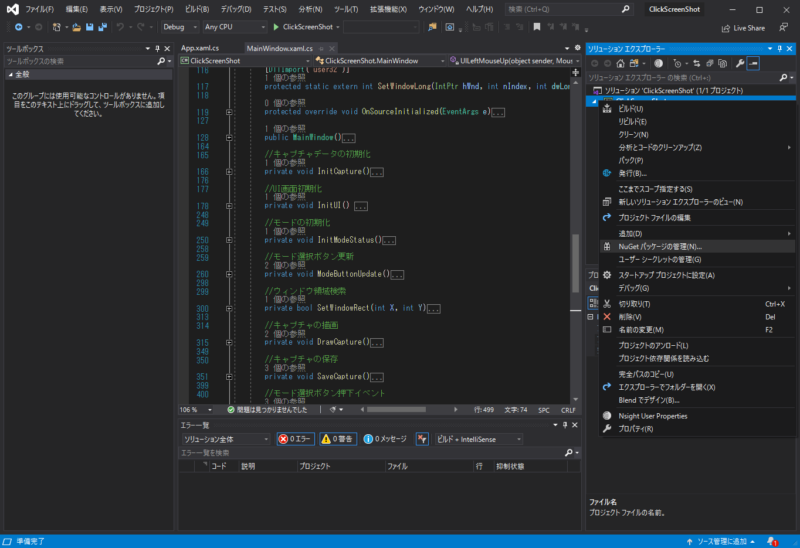
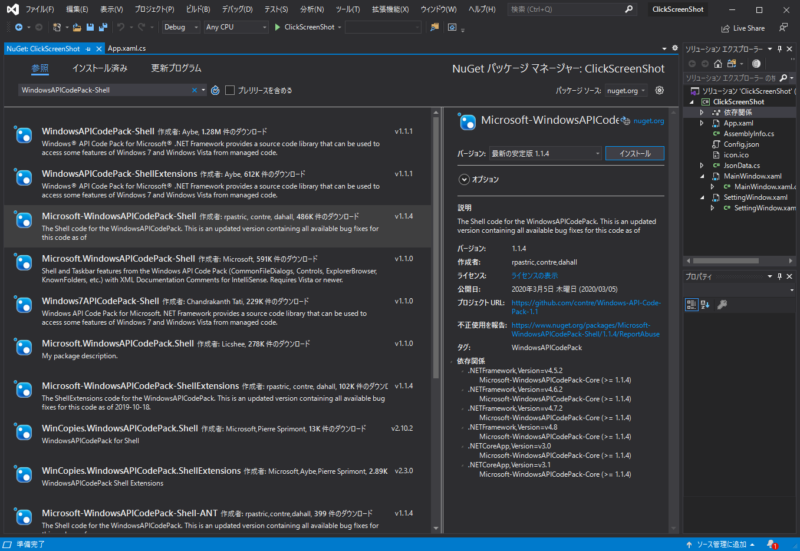
「SettingWindow.xaml.cs」を次のように編集します。設定用のウィンドウをこだわっても仕方ないので、 突貫工事感は否めないですが。。。
using Microsoft.WindowsAPICodePack.Dialogs;
using System;
using System.Collections.Generic;
using System.IO;
using System.Text.Json;
using System.Windows;
using System.Windows.Controls;

namespace ClickScreenShot
{
    public partial class SettingWindow : Window
    {
        //固定値
        private const int EVENT_SAVE = 0;
        private const int EVENT_CANCEL = 1;
        private const int EVENT_FOLDER = 2;
        private const string CLICKSCREENSHOT_DEFAULT_FOLDER = "CLICKSCREENSHOT_DEFAULT_FOLDER";

        //UI画面
        Canvas UICanvas { get; set; }

        //保存先フォルダ
        TextBox FolderTextBox { get; set; }

        //起動時のモード
        List<RadioButton> StartModeRadioButton { get; set; }

        public SettingWindow()
        {
            InitializeComponent();

            //スタイル
            Title = "設定";
            Width = 400;
            Height = 180;
            ResizeMode = ResizeMode.NoResize;               //ウィンドウサイズの固定
            Background = SystemColors.ControlLightBrush;    //背景色
            Topmost = true;                                 //最前面表示

            //表示位置
            Top = SystemParameters.PrimaryScreenHeight - 220;
            Left = SystemParameters.PrimaryScreenWidth - 400;

            //UI画面初期化
            InitUI();
            this.Content = UICanvas;

            //設定読み込み
            ReadJson();
        }

        //UI画面初期化
        private void InitUI()
        {
            //UI画面生成
            UICanvas = new Canvas();

            //保存先フォルダ表示/参照ボタン生成
            TextBlock FolderTextBlock = new TextBlock()
            {
                Width = 100,
                Height = 20,
                Text = "保存先フォルダ",
                FontSize = 12
            };

            FolderTextBox = new TextBox()
            {
                Width = 270,
                Height = 30,
                TextWrapping = TextWrapping.Wrap,
                TextAlignment = TextAlignment.Left,
                VerticalScrollBarVisibility = ScrollBarVisibility.Auto,
                Text = "",
                FontSize = 10
            };

            Button FolderButton = new Button()
            {
                Width = 75,
                Height = 25,
                Content = "参照",
                Tag = EVENT_FOLDER
            };
            FolderButton.Click += new RoutedEventHandler(EventButtonClick);

            //起動時モード表示生成
            TextBlock ModeTextBlock = new TextBlock()
            {
                Width = 100,
                Height = 20,
                Text = "起動時の撮影モード",
                FontSize = 12
            };

            RadioButton ScreenRadioButton = new RadioButton()
            {
                Width = 75,
                Height = 20,
                Content = "全画面領域",
                FontSize = 10
            };

            RadioButton WIndowRadioButton = new RadioButton()
            {
                Width = 75,
                Height = 20,
                Content = "ウィンドウ選択",
                FontSize = 10
            };

            RadioButton RectRadioButton = new RadioButton()
            {
                Width = 75,
                Height = 20,
                Content = "矩形選択",
                FontSize = 10
            };

            StartModeRadioButton = new List<RadioButton>();
            StartModeRadioButton.Add(ScreenRadioButton);
            StartModeRadioButton.Add(WIndowRadioButton);
            StartModeRadioButton.Add(RectRadioButton);

            //保存/キャンセルボタン生成
            Button SaveButton = new Button()
            {
                Width = 75,
                Height = 25,
                Content = "保存",
                Tag = EVENT_SAVE
            };
            SaveButton.Click += new RoutedEventHandler(EventButtonClick);

            Button CancelButton = new Button()
            {
                Width = 75,
                Height = 25,
                Content = "キャンセル",
                Tag = EVENT_CANCEL
            };
            CancelButton.Click += new RoutedEventHandler(EventButtonClick);

            //UI画面に追加
            Canvas.SetTop(FolderTextBlock, 5);
            Canvas.SetTop(FolderTextBox, 25);
            Canvas.SetTop(FolderButton, 25);

            Canvas.SetTop(ModeTextBlock, 55);
            Canvas.SetTop(ScreenRadioButton, 75);
            Canvas.SetTop(WIndowRadioButton, 75);
            Canvas.SetTop(RectRadioButton, 75);

            Canvas.SetTop(SaveButton, 105);
            Canvas.SetTop(CancelButton, 105);

            Canvas.SetLeft(FolderTextBlock, 20);
            Canvas.SetLeft(FolderTextBox, 20);
            Canvas.SetLeft(FolderButton, 300);

            Canvas.SetLeft(ModeTextBlock, 20);
            Canvas.SetLeft(ScreenRadioButton, 20);
            Canvas.SetLeft(WIndowRadioButton, 100);
            Canvas.SetLeft(RectRadioButton, 180);

            Canvas.SetLeft(SaveButton, 220);
            Canvas.SetLeft(CancelButton, 300);

            UICanvas.Children.Add(FolderTextBlock);
            UICanvas.Children.Add(FolderTextBox);
            UICanvas.Children.Add(FolderButton);

            UICanvas.Children.Add(ModeTextBlock);
            UICanvas.Children.Add(ScreenRadioButton);
            UICanvas.Children.Add(WIndowRadioButton);
            UICanvas.Children.Add(RectRadioButton);

            UICanvas.Children.Add(SaveButton);
            UICanvas.Children.Add(CancelButton);
        }

        //設定読み込み
        private void ReadJson()
        {
            //モードをJsonファイルから取得
            using FileStream fs = new FileStream("./Config.json", FileMode.Open, FileAccess.Read);
            using StreamReader sr = new StreamReader(fs);
            JsonData JsonIn = JsonSerializer.Deserialize<JsonData>(sr.ReadToEnd());

            //保存先フォルダ
            FolderTextBox.Text = JsonIn.SaveFolderJson;
            if(FolderTextBox.Text == CLICKSCREENSHOT_DEFAULT_FOLDER)
            {
                FolderTextBox.Text = System.Environment.GetFolderPath(Environment.SpecialFolder.MyPictures);
                FolderTextBox.Text += "\\ClickScreenShot";
            }

            //起動時のモード
            StartModeRadioButton[JsonIn.ModeStatusJson].IsChecked = true;
        }

        //ボタン押下イベント
        private void EventButtonClick(object sender, RoutedEventArgs e)
        {
            //ボタンに応じた動作を行う
            Button EventButton = (Button)sender;

            switch (EventButton.Tag)
            {
                case EVENT_SAVE:
                    //保存データ作成
                    JsonData JsonOut = new JsonData
                    {
                        ModeStatusJson = 0,
                        SaveFolderJson = FolderTextBox.Text
                    };

                    for(int i = 0; i < 3; i++)
                    {
                        if (StartModeRadioButton[i].IsChecked == true) {
                            JsonOut.ModeStatusJson = i;
                            break;
                        }
                    }

                    //Jsonファイルに書き込み
                    FileStream WriteFs = new FileStream("./Config.json", FileMode.Create, FileAccess.Write);
                    StreamWriter WriteSw = new StreamWriter(WriteFs);
                    WriteSw.Write(JsonSerializer.Serialize(JsonOut));
                    WriteSw.Close();
                    WriteFs.Close();

                    //ウィンドウを閉じる
                    Close();

                    break;
                case EVENT_CANCEL:
                    //ウィンドウを閉じる
                    Close();

                    break;
                case EVENT_FOLDER:
                    //フォルダ選択ダイアログの表示
                    CommonOpenFileDialog SaveFolderDialog = new CommonOpenFileDialog()
                    {
                        Title = "保存先フォルダを選択する",
                        RestoreDirectory = true,
                        IsFolderPicker = true,
                    };

                    //選択されたフォルダを表示
                    if (SaveFolderDialog.ShowDialog() == CommonFileDialogResult.Ok) {
                        FolderTextBox.Text = SaveFolderDialog.FileName;
                    }

                    break;
                default:

                    break;
            }
        }
    }
}
タスクトレイのメニューから設定画面を呼び出せるようにする
最後に設定画面を呼び出せるようにします。
「App.xaml.cs」の「App」クラス内に次のコードを追加。
//固定値
private const int MENU_EXIT = 0;
private const int MENU_SETTING = 1;

//設定画面
SettingWindow SettingMenu { get; set; }
「OnStartup」メソッドを次のように修正。
protected override void OnStartup(StartupEventArgs e)
{
    base.OnStartup(e);

    //任意のタイミングでのみ閉じる
    ShutdownMode = ShutdownMode.OnExplicitShutdown;

    //多重起動の禁止
    Mutex mutex = new Mutex(false, "ClickScreenShot");
    if (!mutex.WaitOne(0, false))
    {
        MessageBox.Show("既に起動しています");
        Application.Current.Shutdown();
    }

    //アイテムを生成
    ToolStripMenuItem ExitItem = new ToolStripMenuItem()
    {
        Text = "Exit",
        Tag = MENU_EXIT
    };
    ExitItem.Click += new EventHandler(MenuItemClick);

    ToolStripMenuItem SettingItem = new ToolStripMenuItem()
    {
        Text = "Setting",
        Tag = MENU_SETTING
    };
    SettingItem.Click += new EventHandler(MenuItemClick);

    //メニューを生成
    ContextMenuStrip TrayMenu = new ContextMenuStrip();
    TrayMenu.Items.Add(ExitItem);
    TrayMenu.Items.Add(SettingItem);

    //タスクトレイにアイコンを表示
    System.IO.Stream IconStream = GetResourceStream(new Uri("icon.ico", UriKind.Relative)).Stream;
    NotifyIcon TrayIcon = new NotifyIcon
    {
        Icon = new System.Drawing.Icon(IconStream),
        Text = "ClickScreenShot",
        ContextMenuStrip = TrayMenu,
        Visible = true
    };
    TrayIcon.Click += new EventHandler(IconClick);
}
「MenuItemClick」メソッドを次のように修正。
private void MenuItemClick(object sender, EventArgs e)
{
    ToolStripMenuItem ClickItem = (ToolStripMenuItem)sender;

    //メニューで分岐
    switch (ClickItem.Tag)
    {
        case MENU_EXIT:
            //Exit
            Application.Current.Shutdown();
            break;
        case MENU_SETTING:
            //Setting
            //ウィンドウが存在する場合ウィンドウを閉じる
            if (SettingMenu != null)
            {
                SettingMenu.Close();
            }
            SettingMenu = new SettingWindow();
            SettingMenu.Show();
            break;
        default:
            break;
    }
}
動作確認
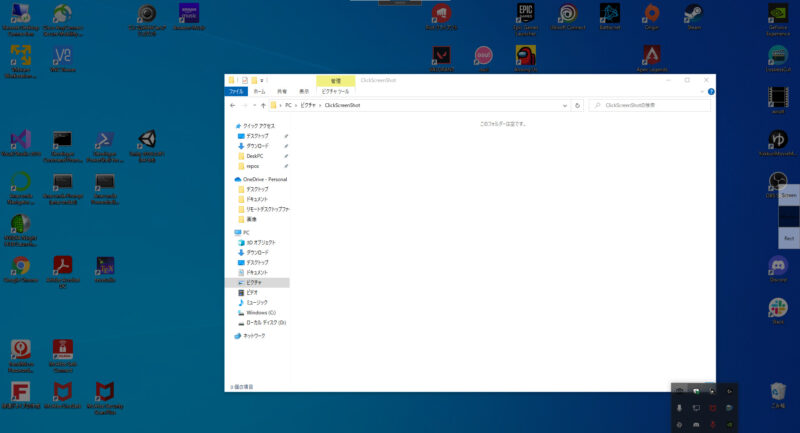
アイコンから設定画面を呼び出せることが確認できた。


編集ツールってペイントでよくね?
よくよく考えたらスクショ撮った後にペイントが開けば良い。
「MainWindow.xaml.cs」の「usingディレクティブ」に次のコードを追加。
using System.Diagnostics;
「MainWindow.xaml.cs」の「MainWindow」クラス内「SaveCapture」メソッドを以下のように修正。(最終行の追加)
//キャプチャの保存
private void SaveCapture()
{
    //矩形領域の複製
    Rectangle SaveRect = CaptureRect;

    //例外処理
    if (SaveRect.Width == 0 || SaveRect.Height == 0)
    {
        return;
    }

    //矩形領域の調整
    if (SaveRect.Width < 0)
    {
        SaveRect.X += SaveRect.Width;
        SaveRect.Width *= -1;
    }
    if (SaveRect.Height < 0)
    {
        SaveRect.Y += SaveRect.Height;
        SaveRect.Height *= -1;
    }

    //保存先フォルダの取得
    using FileStream fs = new FileStream("./Config.json", FileMode.Open, FileAccess.Read);
    using StreamReader sr = new StreamReader(fs);
    JsonData JsonIn = JsonSerializer.Deserialize<JsonData>(sr.ReadToEnd());
    string FolderName = JsonIn.SaveFolderJson;

    //規定フォルダへの変換
    if(FolderName == CLICKSCREENSHOT_DEFAULT_FOLDER)
    {
        FolderName = System.Environment.GetFolderPath(Environment.SpecialFolder.MyPictures);
        FolderName += "\\ClickScreenShot";
    }

    //フォルダが存在しない場合は作成する
    if (!Directory.Exists(FolderName))
    {
        Directory.CreateDirectory(FolderName);
    }

    string FileName = FolderName + "\\ClickScreenShot " + DateTime.Now.ToString("yyyy.MM.dd-HH.mm.ss.fff") + ".png";

    //画像の保存
    Bitmap SaveBitmap = CaptureBitmap.Clone(SaveRect, CaptureBitmap.PixelFormat);
    SaveBitmap.Save(FileName, System.Drawing.Imaging.ImageFormat.Png);

    //ペイントの起動
    Process.Start("mspaint.exe", "\""+ FileName + "\"");
}
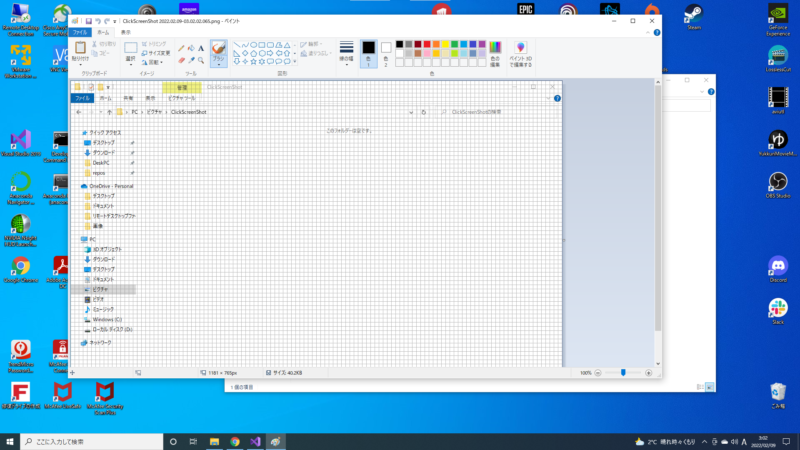
保存後にペイントが開くようになった。
最後に
とりあえず、それっぽいものはできた(編集ツールサボった)。
ブログ用に全てcsで書いてみたのですが、普通に大変な上、かなり汚い。納得いかないので、自分用に作り直します。。。
気が向いたらダウンロードできるようにします。
作り直して、ちょっと機能を足したものをこちらでダウンロードできるようにしました。


コメント